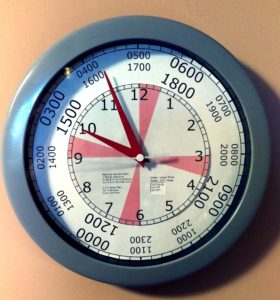
UTC Radio Clock – AA0CN V1.0

This is a printable clock face for 8″ analog clocks, with a fixed “Local” inner wheel and a rotatable “UTC” outer wheel. The outer wheel may be adjusted twice a year for Daylight Savings Time changes, or adjusted for time zone changes.
Inspiration was taken from maritime radio room clocks, with marked periods for 3 minutes after every 15 minute interval for distress silence, which also doubles as a marker for 3 minutes every 3 hours per ad-hoc radio schedules such as the 3-3-3 plan.
https://www.rarchams.org/wp/wp-content/uploads/2020/04/RadioClock_AA0CN_v1_0__OUTER.pdf
https://www.rarchams.org/wp/wp-content/uploads/2020/04/RadioClock_AA0CN_v1_0__INNER.pdf
Instructions:
- Print out the two above linked PDFs at full size onto heavy cardstock paper.
- Cut away the gray sections of the Inner and Outer wheels, including the grey window box on the inner wheel so the current timezone is visible through the window when assembled.
- Remove battery and disassemble clock: Remove glass so face is accessible and remove clock hands.
- On both paper wheels, cut center hole for clock hand post to size.
- Insert the larger UTC wheel first, allow to rotate.
- Using double-sided tape, glue, or similar, affix the inner Local time wheel to the clock body through the hole of the outer UTC wheel, so the center is stuck down but the UTC wheel can still freely move. Remember to orient “12 O’Clock” to the top of the clock body!
- Replace hands back onto the clock. By placing them back into the “12:00” position, it is easy to get the hour/minute offset correct.
- Adjust the outer UTC wheel so current timezone is displayed through Local time window.
- Reassemble clock body, replace battery, and synchronize to WWV
